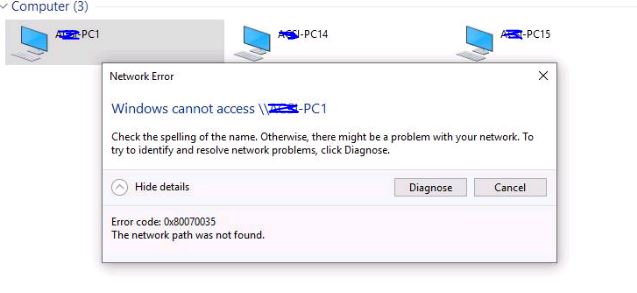
I am facing an issue with accessing the network through a standard account. Although it works fine when I use my administrator account, the same is not true for the standard account. What steps can I take to resolve this problem?
3 Answers
Introduction:
Windows operating system is the most widely used operating system in the world. It provides a user-friendly interface and a plethora of features to make the user experience seamless. However, sometimes users may encounter errors while trying to access the network through a standard account. This error can be frustrating and can hamper the productivity of the user. In this blog post, we will discuss the steps that can be taken to resolve this error.
What is a Standard Account?
A standard account is a type of user account in Windows that has limited access to the system. It is designed for users who do not require administrative privileges to perform their tasks. A standard account user can use most of the software installed on the system, but they cannot install or uninstall software, change system settings, or perform any other administrative tasks.
Why am I Getting an Error While Accessing the Network?
If you are getting an error while accessing the network through a standard account, it is most likely due to security restrictions. Windows has several security measures in place to prevent unauthorized access to the system. By default, standard accounts are not allowed to access the network. This is done to prevent malware or other malicious software from accessing the network and causing harm to the system.
How to Fix the Error?
There are several steps that can be taken to fix the error and allow the standard account to access the network. Here are some of the most effective methods:
Method 1: Enable Network Discovery
Network Discovery is a feature in Windows that allows the computer to see other computers and devices on the network. By enabling Network Discovery, you can allow the standard account to access the network. Here are the steps to enable Network Discovery:
1. Click on the Windows Start button and type “Control Panel” in the search bar.
2. Click on the Control Panel app to open it.
3. Click on the “Network and Sharing Center” option.
4. Click on the “Change advanced sharing settings” option.
5. Under the “Network discovery” section, select the “Turn on network discovery” option.
6. Click on the “Save changes” button.
Method 2: Allow Access Through the Firewall
Windows Firewall is a security feature in Windows that monitors incoming and outgoing network traffic. By default, it blocks all incoming network traffic. To allow the standard account to access the network, you need to allow the necessary programs through the firewall. Here are the steps to allow access through the firewall:
1. Click on the Windows Start button and type “Control Panel” in the search bar.
2. Click on the Control Panel app to open it.
3. Click on the “System and Security” option.
4. Click on the “Windows Firewall” option.
5. Click on the “Allow an app or feature through Windows Firewall” option.
6. Click on the “Change settings” button.
7. Scroll down to find the program you want to allow through the firewall.
8. Check the box next to the program to allow it through the firewall.
9. Click on the “OK” button.
Method 3: Enable Sharing
Sharing is a feature in Windows that allows users to share files and folders with other users on the network. By enabling sharing, you can allow the standard account to access the network. Here are the steps to enable sharing:
1. Right-click on the folder or file you want to share.
2. Click on the “Properties” option.
3. Click on the “Sharing” tab.
4. Click on the “Advanced Sharing” button.
5. Check the box next to “Share this folder”.
6. Click on the “Permissions” button.
7. Select the user account you want to share the folder with.
8. Choose the level of access you want to give the user.
9. Click on the “OK” button.
Method 4: Add the Standard Account to the Administrator Group
If none of the above methods work, you can try adding the standard account to the administrator group. This will give the user administrative privileges and allow them to access the network. Here are the steps to add the standard account to the administrator group:
1. Click on the Windows Start button and type “Computer Management” in the search bar.
2. Click on the “Computer Management” app to open it.
3. Click on the “Local Users and Groups” option.
4. Click on the “Groups” folder.
5. Double-click on the “Administrators” group.
6. Click on the “Add” button.
7. Enter the name of the standard account you want to add.
8. Click on the “OK” button.
Conclusion:
In conclusion, errors while accessing the network through a standard account can be frustrating. However, by following the steps outlined in this blog post, you can easily fix the error and allow the standard account to access the network. It is important to note that enabling access to the network through a standard account can pose security risks. Therefore, it is recommended to use this feature only when necessary and with caution.
It is likely that the issue is related to the permissions set on the standard user account. Here are a few things you can try to fix this issue:
- Check the network settings on the standard user account:
- Go to the Control Panel and click on Network and Internet.
- Click on Network and Sharing Center.
- Click on Change advanced sharing settings.
- Make sure that the network discovery and file and printer sharing options are turned on for the private and public networks.
- Check the firewall settings:
- Go to the Control Panel and click on System and Security.
- Click on Windows Defender Firewall.
- Click on Allow an app or feature through Windows Defender Firewall.
- Make sure that the network access apps and features are allowed through the firewall.
- Check the network adapter settings:
- Go to the Control Panel and click on Network and Internet.
- Click on Network and Sharing Center.
- Click on Change adapter settings.
- Right-click on the network adapter and select Properties.
- Make sure that the Internet Protocol Version 4 (TCP/IPv4) and Internet Protocol Version 6 (TCP/IPv6) options are checked.
- Reset the network settings:
- Go to the Control Panel and click on Network and Internet.
- Click on Network and Sharing Center.
- Click on Change adapter settings.
- Right-click on the network adapter and select Disable.
- Right-click on the network adapter again and select Enable.
If none of these steps help, you may want to try creating a new standard user account and see if the network access issue persists. If it does, there may be a more complex issue at play that will require further troubleshooting.
To fix the issue, you need to run Command Prompt as an administrator on the target device and enter the following command:
reg add HKEY_LOCAL_MACHINE\Software\Policies\Microsoft\Windows\LanmanWorkstation /v AllowInsecureGuestAuth /t REG_DWORD /d 1 /fThen restart the device, and the problem should be resolved.
It’s important to note that this solution could compromise your system’s security, and it’s recommended that you continue to use an administrator account instead.
Learn more at: https://support.microsoft.com/en-us/help/4046019/guest-access-in-smb2-disabled-by-default-in-windows-10-and-windows-ser