Is there a way to view all the songs in iTunes that are not already on my iPod, either through a setting or a user-script? I frequently add new music to iTunes but only want some of it on my iPod, so I need a method to browse through new music.
The “Date Added” field is not helpful in identifying new music since all my music has the same date due to a recent laptop change. Additionally, my musical preferences may have changed, and I may want to add songs to my iPod that I previously did not want when I first added them to iTunes.
I believe a script that adds all non-iPod songs to a playlist, or assigns a certain attribute to the songs for filtering into a smart playlist, would be useful, but I am unsure how to create one. I am also wondering if there is a built-in method to accomplish this using the iTunes app version 12.9.6.3 on Windows 10.
3 Answers
Introduction
iTunes is a great music management tool that allows users to organize their music, create playlists, and sync their music with their iPod or other devices. However, if you frequently add new music to iTunes, it can be challenging to identify which songs are not already on your iPod. In this blog post, we will discuss some methods to view all songs that are not already on your iPod.
Method 1: Use a Smart Playlist
One way to view all songs that are not on your iPod is to use a smart playlist. A smart playlist is a dynamic playlist that automatically updates based on criteria that you set. To create a smart playlist, follow these steps:
1. Open iTunes and click on the File menu.
2. Click on New > Smart Playlist.
3. In the Smart Playlist window, click on the first drop-down menu and select “Playlist” > “is” > “Music.”
4. Click on the second drop-down menu and select “iPod” > “is not.”
5. Click on the “+” button to add another criterion.
6. In the third drop-down menu, select “Date Added” > “is in the last” > “1 week” (or any other time frame you prefer).
7. Click on the “OK” button to create the smart playlist.
This smart playlist will show all the songs that are in your iTunes library but not on your iPod and that were added in the last week. You can adjust the time frame or other criteria to fit your preferences.
Method 2: Use a Third-Party App
Another way to view all songs that are not on your iPod is to use a third-party app. One such app is iExplorer, which allows you to access the music on your iPod and view the differences between your iPod and iTunes library. Here’s how to use iExplorer:
1. Download and install iExplorer on your computer.
2. Connect your iPod to your computer using a USB cable.
3. Open iExplorer and click on the “Media Library” button.
4. Click on the “Music” folder.
5. Click on the “iPod Control” folder.
6. Click on the “Music” folder.
7. Click on the “iTunes” folder.
8. In the “iTunes” folder, you will see a list of all the songs on your iPod that are not in your iTunes library.
You can use this information to add the songs to your iTunes library and sync them with your iPod.
Method 3: Use a User-Script
If you’re comfortable with using user-scripts, you can create a script that adds all non-iPod songs to a playlist or assigns a certain attribute to the songs for filtering into a smart playlist. Here’s an example of a user-script that creates a playlist of all the songs in your iTunes library that are not on your iPod:
1. Open iTunes and click on the File menu.
2. Click on “Library” > “Export Playlist.”
3. Save the playlist as a text file.
4. Open a text editor and create a new file.
5. Copy and paste the following code into the file:
javascript
var iTunesApp = WScript.CreateObject("iTunes.Application");
var tracks = iTunesApp.LibraryPlaylist.Tracks;
var playlist = iTunesApp.CreatePlaylist("Non-iPod Songs");
for (var i = 1; i <= tracks.Count; i++) {
  var track = tracks.Item(i);
  if (!track.Podcast && !track.VideoKind && !track.DRMProtected && !track.Purchased && !track.HasArtwork && !track.IsPurchased && !track.IsMusicVideo && !track.IsPodcast && !track.IsVideo && !track.Location.startsWith("file:///E:/")) {
    playlist.AddTrack(track);
  }
}
6. Replace “Non-iPod Songs” with the name of the playlist you want to create.
7. Save the file with a .js extension.
8. Double-click on the file to run the script.
9. The script will create a playlist of all the songs in your iTunes library that are not on your iPod.
Conclusion
In conclusion, there are several methods to view all songs that are not already on your iPod. You can use a smart playlist, a third-party app, or a user-script. Each method has its advantages and disadvantages, so choose the one that best fits your needs. With these methods, you can easily browse through new music and add songs to your iPod that you may have previously overlooked.
To view all songs that aren’t already on your iPod in iTunes, you can use a smart playlist. Here’s how:
- In iTunes, go to the “File” menu and choose “New” > “Smart Playlist.”
- In the “Smart Playlist” window, set the following criteria:
- “Match the following rule”: “All”
- “Media Kind” is “Music”
- “Playlist” is not “iPod” (or the name of your iPod if it’s different)
- Click “OK” to create the smart playlist.
This will create a playlist that includes all music in your iTunes library that is not on your iPod. You can then use this playlist to browse and add new music to your iPod as needed.
Alternatively, you can use the “Date Added” field to view new music by setting the criteria to “Date Added” is “after” a certain date (e.g. the date you changed laptops). This will show you all the songs that have been added to iTunes since that date, regardless of whether they are on your iPod or not.
If you want to create a script to add all non-iPod songs to a playlist, you can use AppleScript to automate this process. AppleScript is a scripting language that allows you to control and automate tasks on your Mac. There are many resources online that can help you learn how to use AppleScript, including the official AppleScript documentation and various tutorials and forums.
In summary, there are a few different ways to view all songs that aren’t already on your iPod in iTunes:
- Use a smart playlist: This is the easiest and most straightforward method, and it allows you to quickly browse and add new music to your iPod as needed.
- Use the “Date Added” field: This method will show you all the songs that have been added to iTunes since a certain date, regardless of whether they are on your iPod or not.
- Use AppleScript: If you want to automate the process of adding non-iPod songs to a playlist, you can use AppleScript to create a script that does this for you. This method requires some programming knowledge, but it can be a powerful tool for automating tasks in iTunes.
No matter which method you choose, it’s always a good idea to regularly review and update the music on your iPod to make sure you have a fresh and diverse playlist.
To create a new smart playlist for your iPod in iTunes, you need to first open the iPod in the iTunes interface. Then, either right-click just below the last playlist on the iPod or use the shortcut Ctrl+Alt+N on Windows to create the new playlist.
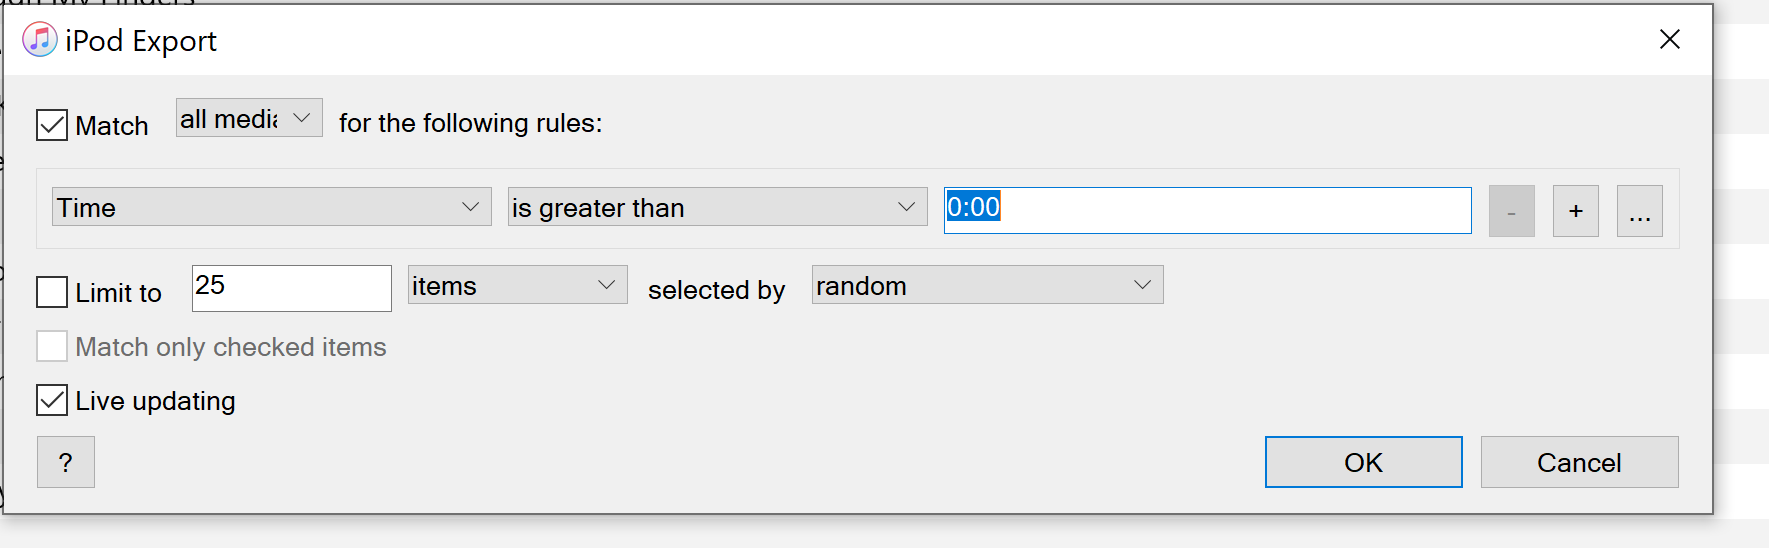
I decided to select all media with a duration greater than 0 seconds, meaning I included everything. You can name the playlist whatever you prefer; I named mine iTunes Export. Save the playlist file in any location, but you can delete it later.
Export the playlist as a text file to avoid exporting the rules as well. If you export as XML, iTunes will list all the music upon importing the playlist to your library.
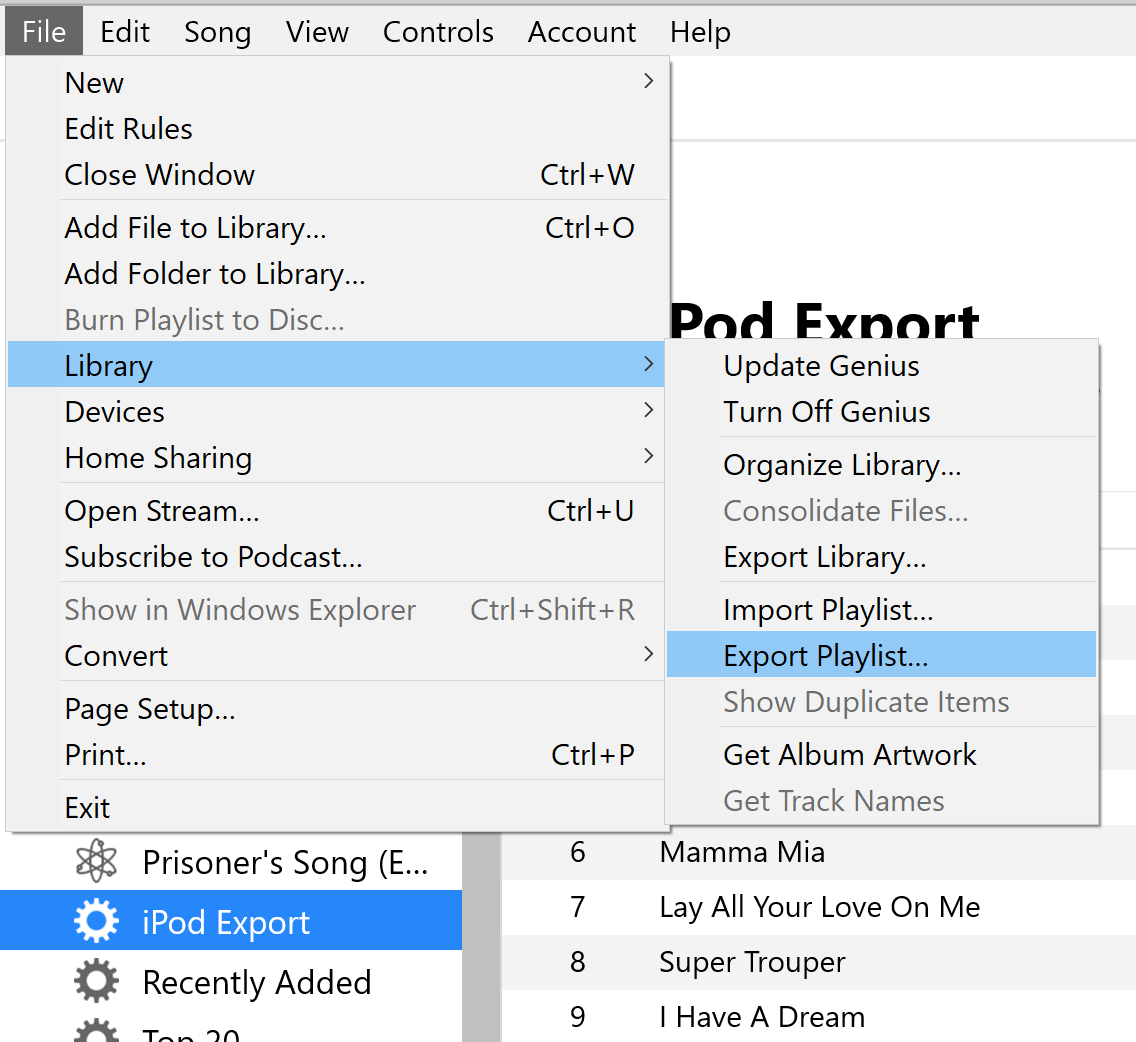
To complete the process, import the previously exported playlist into iTunes by accessing the same menu as the export option, which is located just one option above. You may encounter a message stating that some of the songs could not be imported as they cannot be found. Just click OK since it means that there are songs on your iPod that are not in iTunes, but that is not a problem for this procedure.
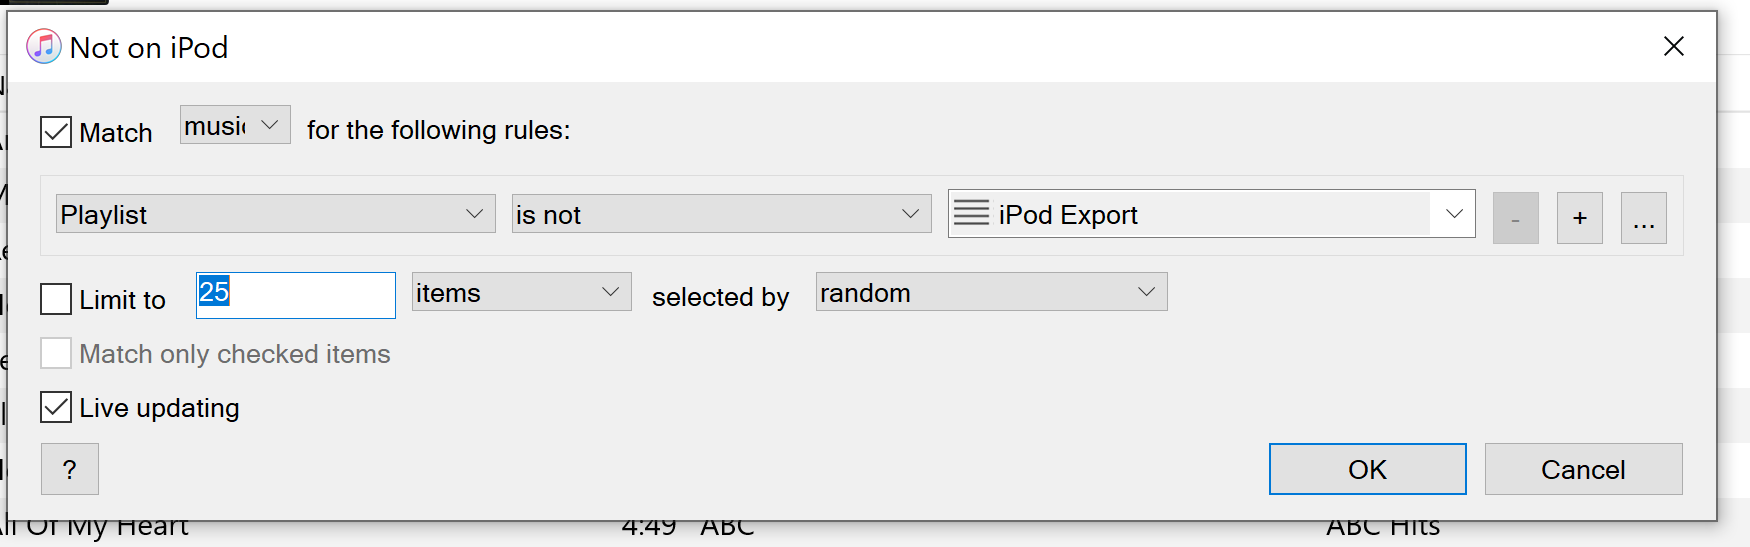
Finally, create a smart playlist in iTunes by following The_Stewart’s answer. Make sure to configure the playlist to exclude any songs that are in the exported and re-imported playlist. In this example, I filter only for music, but if you export all media from the iPod, you can create multiple smart playlists to filter different types of media.
Step five is optional: you no longer require the playlist on your iPod, but it could come in handy if you plan to repeat the process in the future.