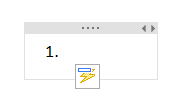
Looking for a solution to disable automatic numbering in the new OneNote for Windows 10, but haven’t been able to find an option for it in the settings despite searching extensively.
It’s frustrating to have a numbered list automatically created whenever ‘1. ‘ is typed, as well as with letters and brackets. This takes up unnecessary time and can be inconvenient.
Is there a way to turn off this feature?
While I prefer the new version of OneNote, I don’t want to switch to the older 2016 version as it lacks some of the newer features.
2 Answers
Introduction
Microsoft OneNote is a popular note-taking application used by millions of people worldwide. With its new version for Windows 10, it comes with several exciting features that make note-taking more comfortable and more enjoyable. However, some users have been experiencing issues with auto-capitalisation and auto-numbering features. In this blog post, we will explore how to turn off auto-capitalisation and auto-numbering in OneNote for Windows 10.
Auto-Capitalisation in OneNote for Windows 10
Auto-capitalisation is a feature that automatically capitalises the first letter of a sentence. While some users find it helpful, others find it annoying, especially when they want to type in lowercase. Fortunately, OneNote for Windows 10 allows you to turn off this feature. Here’s how to do it:
1. Open OneNote for Windows 10 and click on “File” at the top left corner of the screen.
2. Click on “Options” in the left-hand menu.
3. In the “Options” window, click on “Proofing” in the left-hand menu.
4. Scroll down to the “AutoCorrect options” section and uncheck the box next to “Capitalize first letter of sentences.”
5. Click “OK” to save your changes.
Now, auto-capitalisation is disabled in OneNote for Windows 10. You can type in lowercase letters without worrying about the application capitalising them.
Auto-Numbering in OneNote for Windows 10
Auto-numbering is a feature that automatically creates a numbered list when you type in “1. ” or “a) “. This feature can be helpful when you want to create a list quickly, but it can also be annoying when you don’t want to create a list. Unfortunately, OneNote for Windows 10 does not allow you to turn off this feature. However, there are some workarounds that you can use to avoid auto-numbering:
1. Type a space after “1. ” or “a) ” to prevent OneNote from creating a list.
2. Type a backspace after “1. ” or “a) ” to remove the auto-numbering.
3. Type the letters or numbers first, then add the period or bracket. For example, type “a” and then type “. ” to create a list item without auto-numbering.
While these workarounds may not be ideal, they can help you avoid auto-numbering in OneNote for Windows 10.
Using OneNote 2016 Instead
If you find the auto-numbering feature in OneNote for Windows 10 too annoying to deal with, you can switch to OneNote 2016 instead. OneNote 2016 is a desktop application that comes with Microsoft Office and does not have the auto-numbering feature. However, it does not have some of the new features that OneNote for Windows 10 has. Here’s how to download and install OneNote 2016:
1. Go to the Microsoft Office website and sign in with your Microsoft account.
2. Click on “Install Office” at the top right corner of the screen.
3. Click on “Other install options” at the bottom of the screen.
4. Click on “Version” and select “OneNote 2016.”
5. Click on “Install” to download and install OneNote 2016.
Once installed, you can use OneNote 2016 without worrying about auto-numbering.
Conclusion
Auto-capitalisation and auto-numbering can be helpful features when you want to create lists or type in proper case. However, they can also be annoying when you don’t want to use them. OneNote for Windows 10 allows you to turn off auto-capitalisation, but not auto-numbering. If you find auto-numbering too annoying, you can switch to OneNote 2016 instead. With these tips, you can use OneNote for Windows 10 or OneNote 2016 without any issues.
As soon as the list starts, press Ctrl+Z to undo it. An icon will appear that gives you the option to disable auto numbering if you access its menu.

You can also look at your options to find the advanced settings that include a checkbox for automatic numbering and bullet points in lists.