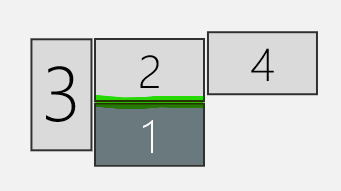
Lately, I changed my computer setup to have four monitors, and my primary display is the laptop screen (#1), while an external display (#2) is positioned just above it. I have noticed that when I attempt to move my mouse pointer between the two screens, it gets stuck at the horizontal boundary, as illustrated in the attached image.
This doesn’t seem to be a problem with Windows’ snapping feature since that only works on vertical edges, and the pointer doesn’t actually cling to the boundary.
To work around this problem, I have discovered that I need to increase my mouse speed and move more quickly across the boundary between the two screens, almost like taking a run-up before a long jump.
I have been experiencing this difficulty ever since I switched to this computer configuration a few weeks ago. It is worth noting that I am using Windows 10 version 1903 (OS Build 18362.356), and all my monitors are set to a resolution of 1920×1080.
2 Answers
Introduction
A multi-monitor setup is preferred by many professionals who require more screen real estate to work efficiently. However, users may encounter issues such as the mouse pointer sticking to the edge between monitors. This can be frustrating and time-consuming, especially if it happens frequently. In this blog post, we will discuss how to move a mouse pointer between monitors in Windows 10.
Check Display Settings
Before we delve into advanced solutions, it is important to ensure that the display settings are configured correctly. To do this, right-click on the desktop and select “Display Settings”. In the “Multiple displays” section, ensure that the “Extend desktop” option is selected. This will enable the user to move the mouse pointer freely between monitors.
If the “Extend desktop” option is already selected, try changing the orientation of one of the monitors. For example, if monitor #1 is positioned to the left of monitor #2, try changing it to the right. This may resolve the issue and allow the user to move the mouse pointer between monitors without any problems.
Adjust Mouse Settings
If the display settings are configured correctly and the issue persists, try adjusting the mouse settings. Go to “Settings” > “Devices” > “Mouse” and ensure that the “Scroll inactive windows when I hover over them” option is disabled. This may prevent the mouse pointer from sticking to the edge between monitors.
Another option is to adjust the mouse pointer speed. This can be done by going to “Settings” > “Devices” > “Mouse” > “Additional mouse options” and selecting the “Pointer Options” tab. Adjust the speed accordingly and test if the issue persists.
Use Third-Party Software
If the above solutions do not work, users can try using third-party software to move the mouse pointer between monitors. One such software is DisplayFusion, which allows users to configure hotkeys to move the mouse pointer between monitors. Another option is MultiMonitorTool, which enables users to create shortcuts to move the mouse pointer between monitors.
Update Graphics Drivers
Outdated graphics drivers can cause issues with multi-monitor setups, including problems with moving the mouse pointer between monitors. To update the graphics drivers, go to the manufacturer’s website and download the latest drivers for the graphics card. Install the drivers and restart the computer.
Conclusion
In conclusion, moving the mouse pointer between monitors in Windows 10 can be a frustrating experience. However, by checking the display settings, adjusting mouse settings, using third-party software, updating graphics drivers, users can resolve the issue and work efficiently with their multi-monitor setup. If the issue persists, it may be worth contacting the manufacturer for further assistance.
Here are the steps to fix the sticky edge issue in a multi-monitor setup:
1. Identify the problematic screen (let’s call it Screen A) and the adjacent screen with a sticky edge (Screen B).
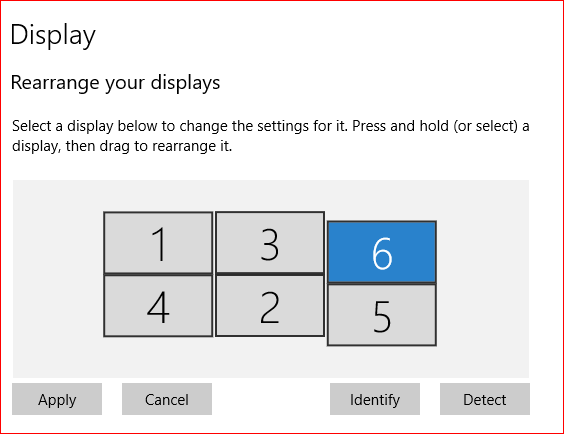
2. Move Screen A so that it overlaps with Screen B.
3. This will cause the auto-alignment to break.
4. Move Screen B back into place, overlapping it with Screen A in the opposite direction from before.
5. Move Screen A back into place, overlapping it with Screen B.
6. Apply the changes and test them.
7. If the issue persists or if another edge becomes problematic, repeat the steps with the problematic screen and the adjacent screen that has a sticky edge.
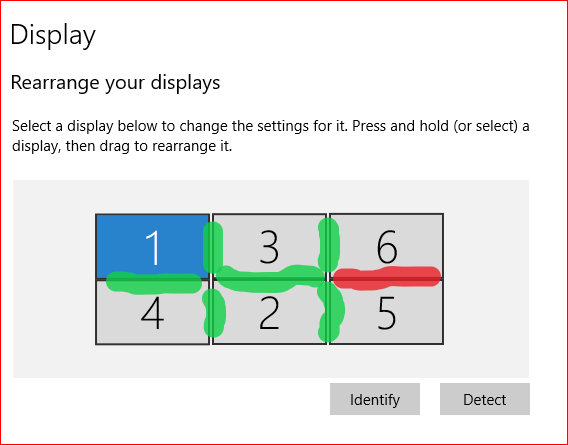
During trial and error fix:
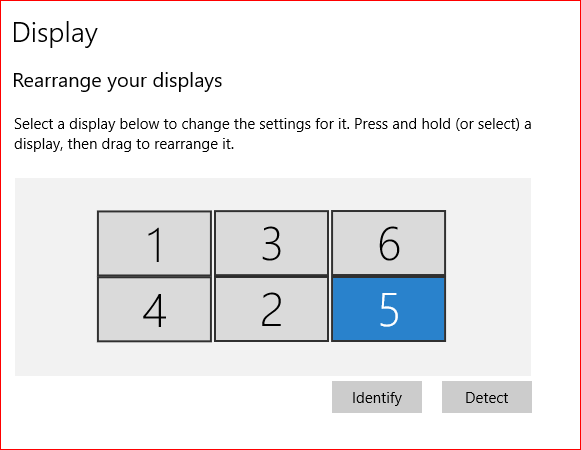
Now fixed – looks the same as the start but problem resolved.
I hope that helps!