To summarize briefly, in attempting to change the default program for .txt files to Visual Studio Code on Windows 10, the author encountered an issue. They found that Visual Studio Code was not listed in the default programs and there was no option to browse and manually select the program’s path:
I have also tried to change the default app in right MB -> open with -> choose another app, but no luck, there was no permanent option.
What is the recommended method for altering the default program then?
2 Answers
Introduction
Windows 10 is a widely used operating system that comes with several features, including the ability to set default programs for different file types. However, some users may encounter issues when trying to change the default program for a specific file type, as the desired program may not be displayed in the settings. In this blog post, we will discuss the reasons for this issue and provide solutions to help you change the default program for any file type on Windows 10.
Reasons for the Default Program Issue
When you try to change the default program for a file type on Windows 10, the desired program may not be displayed in the settings for several reasons. One reason is that the program may not be installed on your computer. If this is the case, you need to install the program before you can set it as the default program for the file type.
Another reason is that the program may not be registered correctly in the Windows registry. The registry contains information about the programs installed on your computer, and if a program is not registered correctly, it may not be displayed in the default program settings.
Finally, the issue may be caused by a bug in the Windows operating system or a conflict between different programs installed on your computer. In this case, you need to troubleshoot the issue to identify the cause and find a solution.
How to Change the Default Program for a File Type
To change the default program for a file type on Windows 10, follow these steps:
Step 1: Right-click on the file you want to change the default program for and select “Properties.”
Step 2: In the Properties window, click on the “Change” button next to “Opens with.”
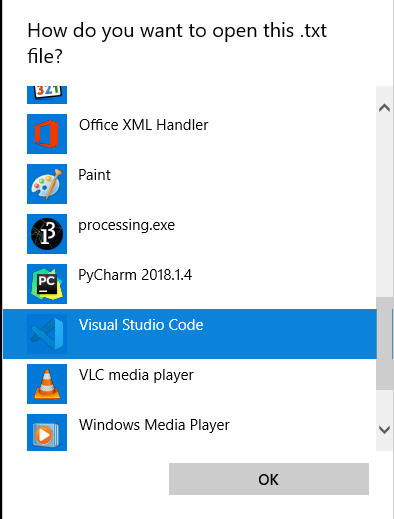
Step 3: In the “How do you want to open this file?” window, select the program you want to use as the default for the file type. If the program is not listed, click on “More apps” to see a list of all the programs installed on your computer.
Step 4: If the program you want to use is still not listed, click on “Look for another app on this PC” and browse to the location where the program is installed. Once you have selected the program, click “Open” to set it as the default for the file type.
Step 5: Click “OK” to save the changes and close the Properties window.
Fixing the Default Program Issue
If the program you want to use as the default for a file type is not displayed in the settings, you can try the following solutions:
Solution 1: Install the Program
If the program is not installed on your computer, you need to install it before you can set it as the default program for the file type. You can download the program from the internet or install it from a CD or DVD.
Solution 2: Register the Program in the Windows Registry
If the program is installed on your computer but not registered correctly in the Windows registry, you can try to register it manually. To do this, follow these steps:
Step 1: Press “Windows + R” to open the Run dialog box.
Step 2: Type “regedit” and press “Enter” to open the Registry Editor.
Step 3: Navigate to the following key: HKEY_CLASSES_ROOTApplications
Step 4: Look for the key that corresponds to the program you want to use as the default for the file type. If the key does not exist, you need to create it. To do this, right-click on the “Applications” key, select “New” and then “Key.” Name the key after the program you want to use.
Step 5: Create a new subkey under the program key and name it “shell.”
Step 6: Create a new subkey under the “shell” key and name it “open.”
Step 7: Create a new subkey under the “open” key and name it “command.”
Step 8: Double-click on the “(Default)” value in the “command” key and enter the path to the program executable file. Make sure to enclose the path in double quotes and add “%1” at the end to represent the file name.
Step 9: Click “OK” to save the changes and close the Registry Editor.
Solution 3: Use a Third-Party Program
If the above solutions do not work, you can use a third-party program to change the default program for a file type. There are several programs available on the internet that can help you do this, such as Default Programs Editor and FileTypesMan. These programs allow you to edit the default programs for file types and add new programs to the list.
Conclusion
Changing the default program for a file type on Windows 10 is a simple process, but sometimes the desired program may not be displayed in the settings. This issue can be caused by several factors, including the program not being installed or registered correctly in the Windows registry. However, by following the solutions provided in this blog post, you can easily change the default program for any file type on your computer.
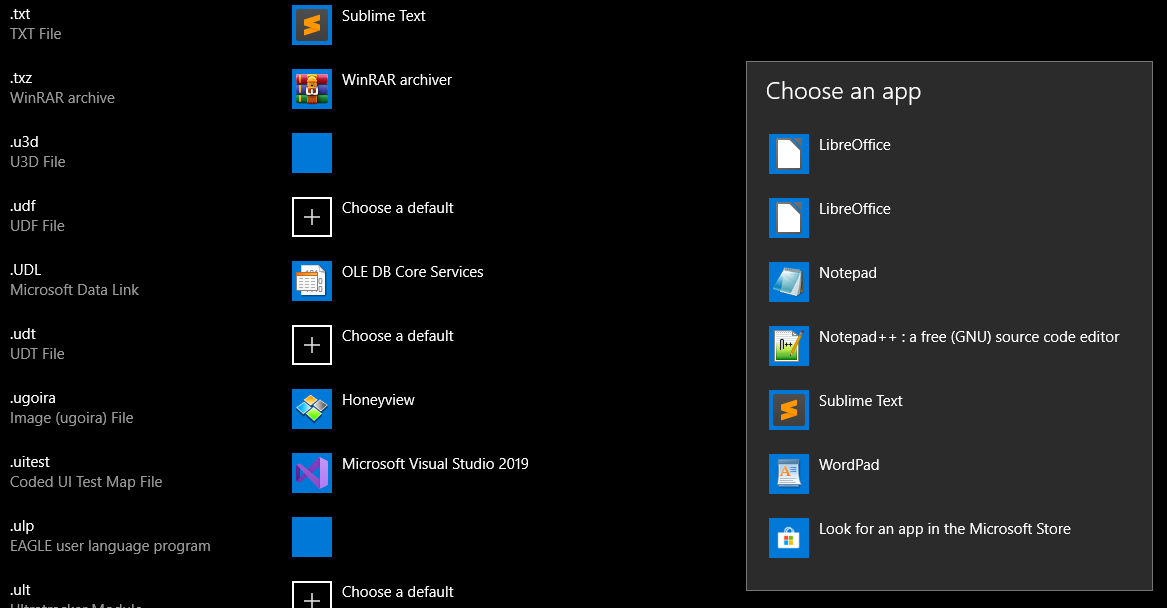
If the “Always use this app to open .txt files” checkbox is not present in your “Choose another app” menu, you may have success by adjusting your default app settings. You can locate this option by searching for it in Windows 10 or by following another method:
- Go to Control Panel
- Click Default Programs
- Click Set your default programs
- Click Choose default apps by file type
- Scroll down to .txt
- Change your application to Visual Studio Code
If the aforementioned method is unsuccessful, it may be possible to change the default program from the command-line interface using the ftype and assoc commands:
ftype txtfile="C:\Path\To\Visual Studio Code.exe"
assoc .txt=txtfile