I have made a personalized context menu item, which appears to function on all kinds of files, including shortcut links. When I choose my custom alternative, it applies the action to the shortcut target rather than the .lnk file. At present, I wish to design an icon to make it more prominent.
My antivirus software and Notepad++ have been able to achieve this, which indicates it is achievable. The only question remaining is how to do it.
3 Answers
Introduction
A context menu is a useful feature in Windows that provides quick access to various options or actions related to the selected file or folder. Windows 7 allows users to customize the context menu by adding their own items. However, adding an icon to a custom context menu item can be a bit tricky. In this blog post, we will discuss how to add an icon to a custom context menu item in Windows 7.
Creating a Custom Context Menu Item
Before we can add an icon to a custom context menu item, we need to create the custom item first. To do this, we will use the registry editor. Here are the steps:
1. Press the Windows key + R to open the Run dialog box.
2. Type “regedit” (without the quotes) and press Enter.
3. Navigate to HKEY_CLASSES_ROOT*shell (for a context menu item that appears for all file types) or HKEY_CLASSES_ROOTDirectoryshell (for a context menu item that appears for folders).
4. Right-click on the “shell” key and select New > Key.
5. Enter a name for the new key (this will be the name of your custom context menu item).
6. Right-click on the new key and select New > Key.
7. Enter “command” as the name of the new key.
8. Double-click on the (Default) value in the “command” key and enter the command you want to run when the custom context menu item is selected. For example, if you want to open Notepad when the item is selected, enter “notepad.exe %1” (without the quotes).
Adding an Icon to the Custom Context Menu Item
Now that we have created the custom context menu item, we can add an icon to it. Here are the steps:
1. Create a 16×16 pixel icon (or any other size you prefer) in .ico format. You can use an image editor like Photoshop or GIMP to create the icon.
2. Save the icon to a location on your computer.
3. Open the registry editor and navigate to the key for your custom context menu item.
4. Right-click on the key and select New > String Value.
5. Enter “Icon” (without the quotes) as the name of the new value.
6. Double-click on the “Icon” value and enter the path to the icon file. For example, if you saved the icon to C:Iconsmyicon.ico, enter “C:Iconsmyicon.ico” (without the quotes).
Testing the Custom Context Menu Item
Now that we have created the custom context menu item and added an icon to it, we can test it to make sure it works. Here are the steps:
1. Right-click on a file or folder to bring up the context menu.
2. Look for your custom context menu item and click on it.
3. The command you entered earlier should run, and the icon you added should be displayed next to the item.
Additional Tips
Here are some additional tips to keep in mind when creating custom context menu items with icons:
– Make sure the icon file is in .ico format. Other formats like .png or .jpg will not work.
– The icon file should be located on a local drive. If it is on a network drive or a removable drive, the icon may not be displayed.
– If you want to use a built-in Windows icon for your custom context menu item, you can use the following format for the icon path: “%SystemRoot%system32SHELL32.dll,-
Conclusion
Adding an icon to a custom context menu item in Windows 7 can be a bit tricky, but it is definitely achievable. By following the steps outlined in this blog post, you can create your own custom context menu items with icons and make them more prominent. Just remember to test your custom item after creating it to make sure it works as expected.
To add an icon to a custom context menu item in Windows 7, you will need to modify the registry. Here are the steps you can follow:
- Press the Windows key + R to open the Run dialog box.
- Type “regedit” into the Run dialog box and press Enter to open the Registry Editor.
- Navigate to the following key in the Registry Editor: HKEY_CLASSES_ROOT*\shellex\ContextMenuHandlers
- Right-click on the “ContextMenuHandlers” key and select “New > Key” from the context menu.
- Type in a name for the new key, which will represent your custom context menu item.
- Right-click on the new key you just created and select “New > String Value” from the context menu.
- Name the new string value “Icon”.
- Double-click on the “Icon” value to edit it.
- In the “Value data” field, enter the full path to the icon file you want to use. You can also enter a resource identifier in the form “module_name,-resource_number”.
After making these changes, you will need to log off and log back on, or restart your computer, for the changes to take effect. When you right-click on a file and select your custom context menu item, it should now display the icon you specified.
Note that modifying the registry can be risky, as making incorrect changes can cause problems with your system. It is always a good idea to create a backup of your registry before making any changes.
Launch regedit.exe and locate the registry key that you generated for the personalized menu option. Then, add a new String value within that key and label it as “Icon”.
To set the path for your personalized icon image file, double-click on the newly created String value and enter the file’s location:
c:\folder\icon.ico
Optionally you could use the Windows shell32.dll file like in my example:
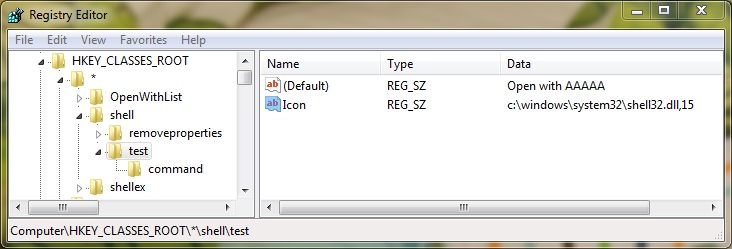
The result:
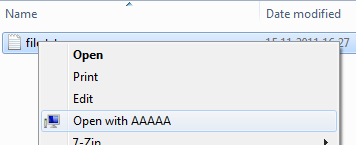
An additional point to mention is that it appears that this technique functions on Windows 7 (and possibly Vista), but when I tested it on Windows XP, the icon did not show up.